Showing posts with label dies. Show all posts

Organizing My Dies - Part 2


I am back with the completion of my die storage. Storing the larger and long dies was a challenge, but I hope I have discovered the pitfalls and some solutions that will make it easier if you choose to implement a new system.


I found two different products. The first is the Office Depot clear pockets. I love the weight and the little thumb notch at the top. Problem - some of my dies such as the PTI seed packet and essential pillow box dies wouldn't fit!


The next product is the Staples sheet protectors. I had to do a couple of things to make them work. The first is of my own choosing to cut 1/2" OFF the top to stay consistent with the clear pockets I had started with. The second was to cut off the binder holes. I wanted the clean look in my box. 

TIP for YOU: If I has starting from scratch I would buy the sheet protectors and cut off the binder holes and forgo the clear pockets. 


As I don't have as many large and longer dies I decided to group these by category such as large dies, impression plates, cover plates, and long border dies. 

TIP for YOU: Do you own any of the masks/stencils used for spray mists? I put my Studio Calico masks as a category in their own page protectors. This way I won't forget that I own them.


For the long border dies I used the sheet protectors and my sewing machine to stitch pockets that are 2" wide. I put the name of each one on the outside.


I received several questions asking if the Spellbinder dies would work in this system. The answer is YES. The only set that I own that wouldn't fit in the small pouches is the long rectangle dies seen below.


The only die that I own that didn't fit in any pocket is my PTI - Front and Center die. It is large enough that it just stands on its own.


I keep my top cutting plate, metal shim, and painter's tape in the front of the box. My embossing pads and extra cutting plates on in the back. Just keeping it all together people.


My box is a matching piece to my smaller Target Threshold Tip Towel Basket. This basket is called the "small basket." The dimensions are 9" L x 7 1/4" W x 6 1/4" H. I love that I can store them on my work counter or . . .


in the cabinet above. You can also see some of the organization I have been doing of ALL my craft supplies. It you are interested in "seeing" inside the cabinets let me know.


I hope you have been inspired to take control of your dies. I think it was a worthwhile investment of my time. If you missed my first post on die organization you can find it here.

Thanks for stopping by! Have a great week. ~Rhonda

Organizing my Dies


How are you storing your dies? Have you outgrown your system? This is the predicament that I faced. My old system relied on baseball trading card page protectors in a zippered notebook. I really liked being able to see several dies on a page but that created problems when there was "a series" of dies and they definitely couldn't be put in alphabetical order without a lot of shifting.


The new system starts with Memorex Keepers. A clear CD & DVD pouch. They are sold in a 50pk for $9.99. I found them at Staples and Office Depot. I cut a 4 1/2" square of Georgia Pacific card stock for each pouch.

(TIP: If you decide to use these I would suggest a  4 1/4" square instead so that you could get 4 pieces from each sheet. I didn't think that through and I just couldn't change midstream.)


Next I used my trusty Brother P-Touch label maker to put the name of the die on the paper. I made sure to put how many dies were in the collection. 


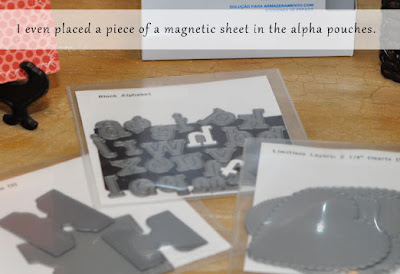
I also put a piece of a magnetic sheet in each pouch that contains an alpha or number set. Did I mention that each pouch has a back flap so you don't lose anything?


For collections that have different blooms for example, I traced around the die and labeled them on the page.


I was really surprised at how many of my dies fit the pouch. Even the tiny envelope die that is pretty large fit.

 
I made dividers using lots of different pattern papers. This is a great way to use up the stash. I cut two 5" squares of patterned paper. I sewed them together with the journal tab that I had die cut and stamped the letter with Fresh Alphabet from PTI. I think they are the perfect weight and look cute too. 


I have categorized my dies alphabetically by company. I briefly considered grouping them by floral, etc. but decided my brain doesn't work that way. 

The final piece of this project was the container. I found what I think is the piece that makes it all work-- the perfect file box at Target in the bathroom area. The reason this box is so perfect is the size 3 1/4" x 10". At 3 1/4" it allows me to flip through the box. I tried higher sides but that made them hard to see.The length is great for being able to stick in a cabinet or leaving out on your work area. There are over 100 pouches in this container. Yeah, UM, I know. I have too many dies!


I smile each time I spy my little box of dies in my craft room. I hope you have a beautiful week. ~Rhonda

PS - Want to know what I did with the long dies such as the scallop border dies? Tune in next Monday for another installment of die organization.
Powered by Blogger.

Keep In Touch

Subscribe via Email

Enter your email address:

About Me

My photo
Texas, United States
Life is full of interesting pieces. I am grateful that I can combine my love of stamping, organization, and DIY projects.

BeStill52

KIM KLASSEN dot COM

Followers

Grab My Button

Mojo Monday Blinkie